onvif学习笔记6:onvif的OSD坐标小记

ONVIF的OSD服务为ONVIF客户端程序提供控制、配置设备(服务端)的OSD。与OSD有关的命令有:CreateOSD、DeleteOSD、GetOSDs、GetOSD、SetOSD、GetOSDOptions,本文不叙述这些接口的用法,仅对OSD坐标做一些个人笔记。

ONVIF标准文档中关于OSD坐标的描述如下:
OSD坐标
从图中看到,onvif中的OSD坐标系是以图像中心点为原始坐标(0,0),坐标范围为-11。左上角为(-1,1),右上角为(1,1),左下角为(-1,-1),右下角为(1,-1)。使用ONVIF协议传输坐标时,就是使用-11之间的坐标范围,但到了设备(作为ONVIF服务端),需要对此相对坐标转换成为实际图像的坐标,在这里,图像坐标与计算机屏幕坐标一致,即左上角为(0, 0)。

下面伪代码是从ONVIF相对坐标转换为设备实际坐标:

1
2
3
4
5
6
7
8
9
10
11
12
13
14
15
16
void SetOSDPos(float x, float y)
{
int pox = 0;
int poy = 0;

// 获取分辨率
int width = 0;
int height = 0;
getsolution(&width, &height);

// 转换为实际坐标 -> pox poy
pox = (1.0 + x) * ((float)width) / 2.0;
poy = (1.0 - y) * ((float)height) / 2.0;

onvif_debug(6, "org pos: (%.2f, %.2f) --> (%d, %d)\n", x, y, pox, poy);
}

下面伪代码是从设备实际坐标转换为ONVIF相对坐标:

1
2
3
4
5
6
7
8
9
10
11
12
13
14
15
16
17
18
19
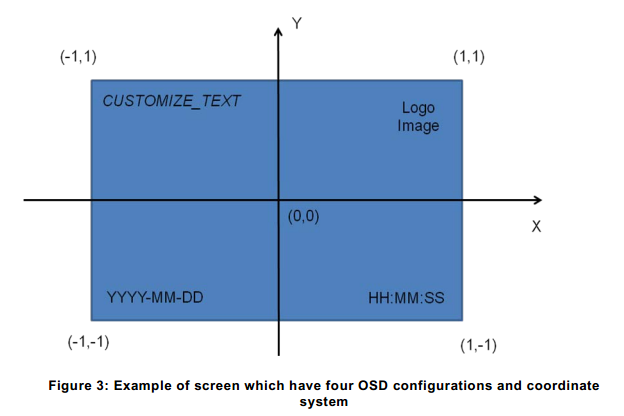
void GetOSDPos(float& x, float& y)
{
// 获取当前OSD实际的坐标
int pox = 0;
int poy = 0;
getpos(&pox, &poy);

// 获取分辨率
int width = 0;
int height = 0;
getsolution(&width, &height);

// 转换为ONVIF的相对坐标 -> x y
x = ((float)(pox - (int)res.width/2))/(float)(res.width/2);
y = ((float)(poy - (int)res.height/2))/(float)(res.height/2);
if (y != 0) y = -y; // 注:浮点数最好不要这样判断

onvif_debug(6, "org pos: (%d, %d) --> (%.2f, %.2f)\n", pox, poy, x, y);
}

李迟 2016.4.6 周三夜