Linux串口编程实践

经常有人问我关于Linux平台的串口编程问题,但我一直没有亲自尝试,首先在本本使用的是USB转串口线,不太稳定;二来只有一台PC,不能测试多个串口(以前写MFC串口程序时使用了虚拟串口软件来模拟多个串口);三来ARM开发板只有区区一个串口(这个用于与PC间通信,对开发板进行操作)。最近,下了决心练习一下。当然,限于实际情况,只能在一个串口下测试,不涉及太高深的知识。

每个类unix系统中的串口设备文件不一样,一般地,Linux中的串口设备文件为/dev/ttySx,其中x为表示串口号的数字,从0开始。即在MS Windows系统中常见的com1、com2,到了Linux中则成了/dev/ttyS0、/dev/ttyS1。Linux的串口使用termios结构体进行配置,这个结构体的成员设置比较麻烦,不像MFC中拖一个控件、设置几个类成员就能解决的,这应该是许多人认为很难的原因。文章不涉及对termios的详细介绍,许多成员、标志也省略,因为文中后面给出的参考资料有详细介绍。同时,文中的“串口”有时与“termios”是同义词。
最基本的串口编程无非涉及下面的几点:

    1. 打开串口;
    1. 设置串口,如波特率、数位,等;
    1. 读/写串口(接收数据、发送数据);
    1. 关闭串口。

一、打开串口

串口的打开需要使用系统调用open,

1
2
3
4
5
6
7
8
9
10
11
12
13
14
15
16
17
18
19
20
21
22
23
24
25
26
27
28
29
int open_port(int port)
{
int fd = -1; /* File descriptor for the port, we return it. */
int ret;
char device[13] = {0}; /* ??? sizeof("/dev/ttyUSB0")=12 */

if (port < 1 || port > 4)
error_ret("Sorry, the port number must be 1~4.");
if (USB_SERIAL)
sprintf(device, "/dev/ttyUSB%d", port-1);
else
sprintf(device, "/dev/ttyS%d", port-1);
//printf("%s %d\n", device, sizeof(device));

fd = open(device, O_RDWR | O_NOCTTY | O_NDELAY);
if (fd == -1)
unix_error_ret("Unable to open the port");

/* block */
ret = fcntl(fd, F_SETFL, 0);
if (ret < 0)
unix_error_ret("fcntl");
ret = isatty(STDIN_FILENO);
if (ret == 0)
error_ret("Standard input is not a terminal device.");
debug_msg("Open the port success!\n");

return fd;
}

我们只能打开前面4个串口(如果存在的话),一般来说足够了。在处理设备文件名称时使用sprintf函数,而不是一一指定文件名称。其中的出错处理函数是自己定义的,可以在在线手册中看到它们的源代码(其实它们是宏定义,不是函数)。

二、关闭串口

串口的关闭十分简单,直接使用系统调用close就可以了。代码如下:

1
2
3
4
5
6
7
8
int close_port(int fd)
{
if(close(fd) < 0)
unix_error_ret("Unable to close the port.");
debug_msg("Close the port success!\n");

return 0;
}

三、设置串口参数

串口的设置是最复杂的,先附上完整的代码,之后再简单说一下。

1
2
3
4
5
6
7
8
9
10
11
12
13
14
15
16
17
18
19
20
21
22
23
24
25
26
27
28
29
30
31
32
33
34
35
36
37
38
39
40
41
42
43
44
45
46
47
48
49
50
51
52
53
54
55
56
57
58
59
60
61
62
63
64
65
66
67
68
69
70
71
72
73
74
75
76
77
78
79
80
81
82
83
84
85
86
87
88
89
90
91
92
93
94
int setup_port(int fd, int speed, int data_bits, int parity, int stop_bits)
{
int speed_arr[] = {B115200, B9600, B38400, B19200, B4800};
int name_arr[] = {115200, 9600, 38400, 19200, 4800};
struct termios opt;
int ret=-1;
int i=0;
int len=0;

ret = tcgetattr(fd, &opt); /* get the port attr */
if (ret < 0)
unix_error_ret("Unable to get the attribute");

opt.c_cflag |= (CLOCAL | CREAD); /* enable the receiver, set local mode */
opt.c_cflag &= ~CSIZE; /* mask the character size bits*/

/* baud rate */
len = sizeof(speed_arr) / sizeof(int);
for (i = 0; i < len; i++)
{
if (speed == name_arr[i])
{
cfsetispeed(&opt, speed_arr[i]);
cfsetospeed(&opt, speed_arr[i]);
}
if (i == len)
error_ret("Unsupported baud rate.");
}

/* data bits */
switch (data_bits)
{
case 8:
opt.c_cflag |= CS8;
break;
case 7:
opt.c_cflag |= CS7;
break;
default:
error_ret("Unsupported data bits.");
}

/* parity bits */
switch (parity)
{
case 'N':
case 'n':
opt.c_cflag &= ~PARENB;
opt.c_cflag &= ~INPCK; /* ?? */
break;
case 'O':
case 'o':
opt.c_cflag|=(INPCK|ISTRIP); /*enable parity check, strip parity bits*/
opt.c_cflag |= (PARODD | PARENB);
break;
case 'E':
case 'e':
opt.c_cflag|=(INPCK|ISTRIP); /*enable parity check, strip parity bits*/
opt.c_cflag |= PARENB;
opt.c_cflag &= ~PARODD;
break;
default:
error_ret("Unsupported parity bits.");
}

/* stop bits */
switch (stop_bits)
{
case 1:
opt.c_cflag &= ~CSTOPB;
break;
case 2:
opt.c_cflag |= CSTOPB;
break;
default:
error_ret("Unsupported stop bits.");
}

/* raw input */
opt.c_lflag &= ~(ICANON | ECHO | ECHOE | ISIG);
/* raw ouput */
opt.c_oflag &= ~OPOST;

tcflush(fd, TCIFLUSH);
opt.c_cc[VTIME] = 0; /* no time out */
opt.c_cc[VMIN] = 0; /* minimum number of characters to read */

ret = tcsetattr(fd, TCSANOW, &opt); /* update it now */
if (ret < 0)
unix_error_ret("Unable to setup the port.");
debug_msg("Setup the port OK!\n");

return 0; /* everything is OK! */
}

首先使用tcgetattr获取串口属性。termios中的成员只能通过“与”(“&”)、“或”(“|”)来操作,而不能直接赋值。之后,设置控制标志CLOCAL和CREAD,这两个选项可以保证程序不会变成端口的所有者,而端口所有者必须去处理发散性作业控制和挂断信号,同时还保证了串行接口驱动会读取过来的数据字节。在设置波特率时使用了点小技巧,就将最常用的放到数组的最前面,校验位也是如此。最后设置原始输入/输出,再使用这些属性重新设置串口。

四、读/写串口

这两个操作同样简单,就是使用系统调用read/write就行了。
本来打算使用两个线程进行读写操作的,但不成功,后面用minicom读取数据,而我们的串口程序只负责发送。我是短接串口的2、3脚进行测试的。让我不明白的是,为何这个程序不是独占串口?是不是上面的代码设置了?这些将会随着学习的深入而解决的。
下面是发送数据的线程:

1
2
3
4
5
6
7
8
9
10
11
12
13
14
15
16
17
18
19
20
21
22
void *write_port_thread(void *argc)
{
int ret;
int fd;
int i = 3;

fd = (int)argc;

//while (i--)
while (1)
{
debug_msg("writing... ");
ret = write(fd, buf, strlen(buf));

if (ret < 0)
pthread_exit(NULL);
write(fd, "\r\n", 2);
debug_msg("write: %d\n", ret);
sleep(1);
}
pthread_exit(NULL);
}

我们的main函数:

1
2
3
4
5
6
7
8
9
10
11
12
13
14
15
16
17
18
19
20
21
22
23
24
25
26
27
28
29
int main(void)
{
int fd;
int ret;

//signal(SIGINT, sig_handle);
fd = open_port(1); /* open the port(com1) */
if (fd < 0)
exit(0);
ret = setup_port(fd, 115200, 8, 'N', 1);
if (ret<0)
exit(0);

ret = pthread_create(&write_tid, NULL, write_port_thread, (void*)fd);
if (ret < 0)
unix_error_exit("Create write thread error.");

#if 0
ret = pthread_create(&read_tid, NULL, read_port_thread, (void*)fd);
if (ret < 0)
unix_error_exit("Create read thread error.");
#endif
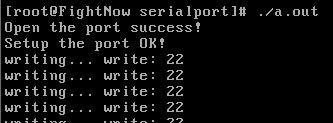
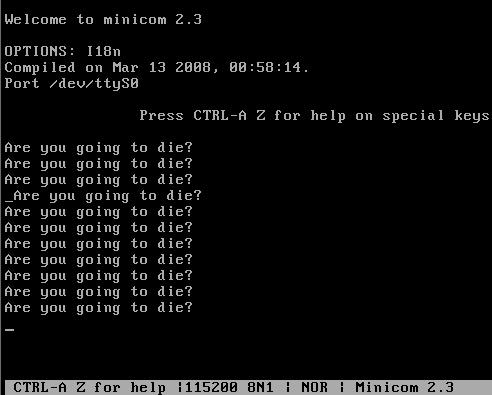
pthread_join(write_tid, NULL);
//pthread_join(read_tid, NULL);
close_port(fd);

return 0;
}

下面是测试图示。图1为发送数据,22表示已发送字符串的长度。
图1 写数据到串口
图2为minicom接收数据,“Are you going to die?”没别的意思,它是《豪门夜宴》中曾志伟、刘嘉玲、张曼玉唱英文版《香夭》时嘉玲姐唱的第一句歌词,由beyond伴奏。
图2 minicom收受数据
(接收的第4行出现了乱码,说明用镊子短接串口不太稳定)

这次实践也尝试了doxygen,它是一个由源代码生成文档的工具,支持多种语法。我将生成的文档放到了我的网站上,可以去看看,里面有一些设置串口的详细信息,不过,说实话,帮助不太大。
本文的程序完整完代码(包括了doxygen生成的文档)下载:serialport-latelee.org.tar.bz2

参考资料:

  1. POSIX操作系统串口编程指南,地址:http://www.easysw.com/~mike/serial/serial.html。如果不能访问,请以“Serial Programming Guide for POSIX Operating Systems”为关键字搜索。本文有些文字就是来自这个指南的翻译。
  2. Linux下串口编程入门,地址:http://www.ibm.com/developerworks/cn/linux/l-serials/
  3. 本站中文在线手册:http://www.latelee.org/yetanothertest/serialport-html-cn/,请点击“文件”进行查看。
  4. 本站英文在线手册:http://www.latelee.org/yetanothertest/serialport-html/,请点击“Files”进行查看。
  5. 本文涉及的源码托管于这个github仓库